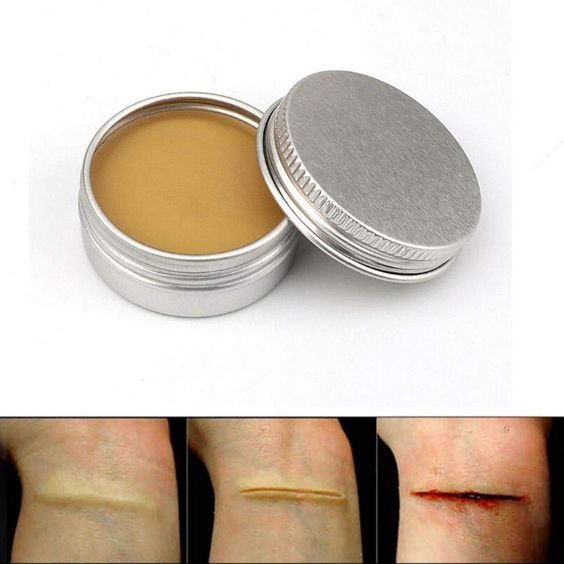
You can make an amazing DIY scar wax and show it off at any makeup event you go to, or even at some parties.
It is a common and popular go-to makeup trend for Halloween, as well as rave parties and the TV industry. Famous makeup artists love to use it on big shoots, when doing music spots, as well as on runway shows.
Scar wax is also quite popular in the YouTube industry, as well as when it comes to SFX makeup. If you want to experiment with this item and you’re not too sure how to use it, keep on reading and find out all there is to know about DIY scar wax!
So, how to create your own homemade scar wax? What ingredients are needed to make a DIY scar wax? Let us see everything..
Ingredients and Tools that you will need:

- Petroleum jelly
- Bowl and teaspoons
- Your favorite foundation
- Makeup wipes
- 2 tablespoons of cornflour
- Vaseline (optional)
- Old brushes
- Knife
- Banana powder
- Fake blood
- A sponge
7 Steps to Make a DIY Scar wax at Home:
Step 1: Use your makeup remover wipes and clean your skin, face, or your body with it. You should work with a clean surface at every given moment. Your created scar wax will adhere to the clean surface the quickest and the easiest. Also, make sure that you’re not overly sensitive or prone to allergies before you begin this process.
Step 2: With the help of a knife or a small spatula, you should scoop out the wax you have, or create your own unique mixture! All you got to do is use two tablespoons of cornflour, and one tablespoon of vaseline. Mix this up with a spoon, or a spatula. Use a clean pot or a plastic dish where you will mash the products.
Step 3: Roll your created mixture into small balls. You might end up with a sticky residue, which is why you should add more Vaseline to its outer layers. This way, the product will be easier to move around and manipulate.
Using it and creating a Makeup masterpiece:
Step 4: Make sure that you are quite patient. Place your created mixture on top of your skin and smooth it down the edge with your utensil or spatula. You can also use a knife. Coat it furthermore with Vaseline to get it flat. You can also use a hairdryer to speed up the process and to let your edges straighten out.

Step 5: Keep on spreading the scar wax till you are satisfied with its shape, length, as well as size. Once you’re satisfied it is time to color this piece with your foundation shade and make it look as realistic as possible!
Step 6: It is time to use fake blood on top of your masterpiece. Paint the outsides with a dark red, and slowly move onto a lighter shade. Also, add a bit of dark brown for depth!
Step 7: Use a makeup sponge or a brush to blend in the product, and to get that ideal and smooth transition. At this point, also use banana powder to set your created wound in place, and to ensure that it lasts throughout the night.
PS: To make the wound look even scarier, you can stick a couple of pin needles and give it an illusion of damaged skin, it will look spooky for sure!
No Vaseline? Here’s how you can make Scar wax without Petroleum Jelly
In case you don’t have vaseline or petroleum jelly at home (which are quite rare to begin with) you can also create this scar wax without these two ingredients! Make sure that you have:

- Vegetable oil (or sunflower oil)
- Flour
- Plastic cup or dish
- Spoons
Step 1: Use three tablespoons of flour. Add two teaspoons of vegetable oil into the mixture.
Step 2: Start mixing the mixture with your spoon immediately since it is important for the oil to bind along with your flour before it soaks it up completely. You will want to avoid dry textures.
Step 3: Mix it for 1-2 minutes, and pour the product into your preferred container so it can harden and get solid.
PS: Another practical tip that you will like and also appreciate is to use lash glue! Why and how? A lash glue has a similar texture to liquid latex and is also easy to move around and maneuver. Just by applying it on top of your skin and letting it dry down for a couple of minutes, you will be able to create a realistic fake wound on top of your skin!
Ready to create your own Scar wax?
Are you ready to explore with your DIY scar wax? This process can be quite fun, but it can also be messy. Make sure that you have all of our previously mentioned ingredients, and follow these simple steps when creating your paste!
Featured image – Tdealexa cc4.0
Ajla Suceska is a Certified make up artist and a professional Nail Technician who lives in Sarajevo, Bosnia and Herzegovina. She has successfully completed 3 distinct make up diplomas and also worked as makeup artist in Etre Belle (A German makeup brand). Besides being a professional makeup artist, and a nail tech, she loves writing beauty articles and contributed to a number of top websites online. In simple, Ajla Suceska is a 23-year old beauty expert who simply lives and breathes fashion and beauty

